
Starlink on Pure DC Power
Starlink on Pure DC Power
Welcome to this next edition of Off Grid CTO featuring my projects and experiences working as the Chief Technology Officer of ModelOp, a great software company designing enterprise management of AI and traditional models. It’s been a little whiles, and I will be posting more soon. This edition actually comes to you from in flight on an airplane headed to a customer visit, so things are changing for sure!
In this episode I will be exploring how I have adapted a Starlink terminal to work on DC power, without their provided router, and without cutting up the expensive and hard to get cable they provide you.
I am providing this blog not as instructions, but just to let you know what I did. This could cause your Starlink to blow up, malfunction, and probably void your warranty, so please proceed at your own risk. If you are not good at wiring things and creating connections for ethernet and power, this is probably not the project for you. Again, I suggest you don’t do this…

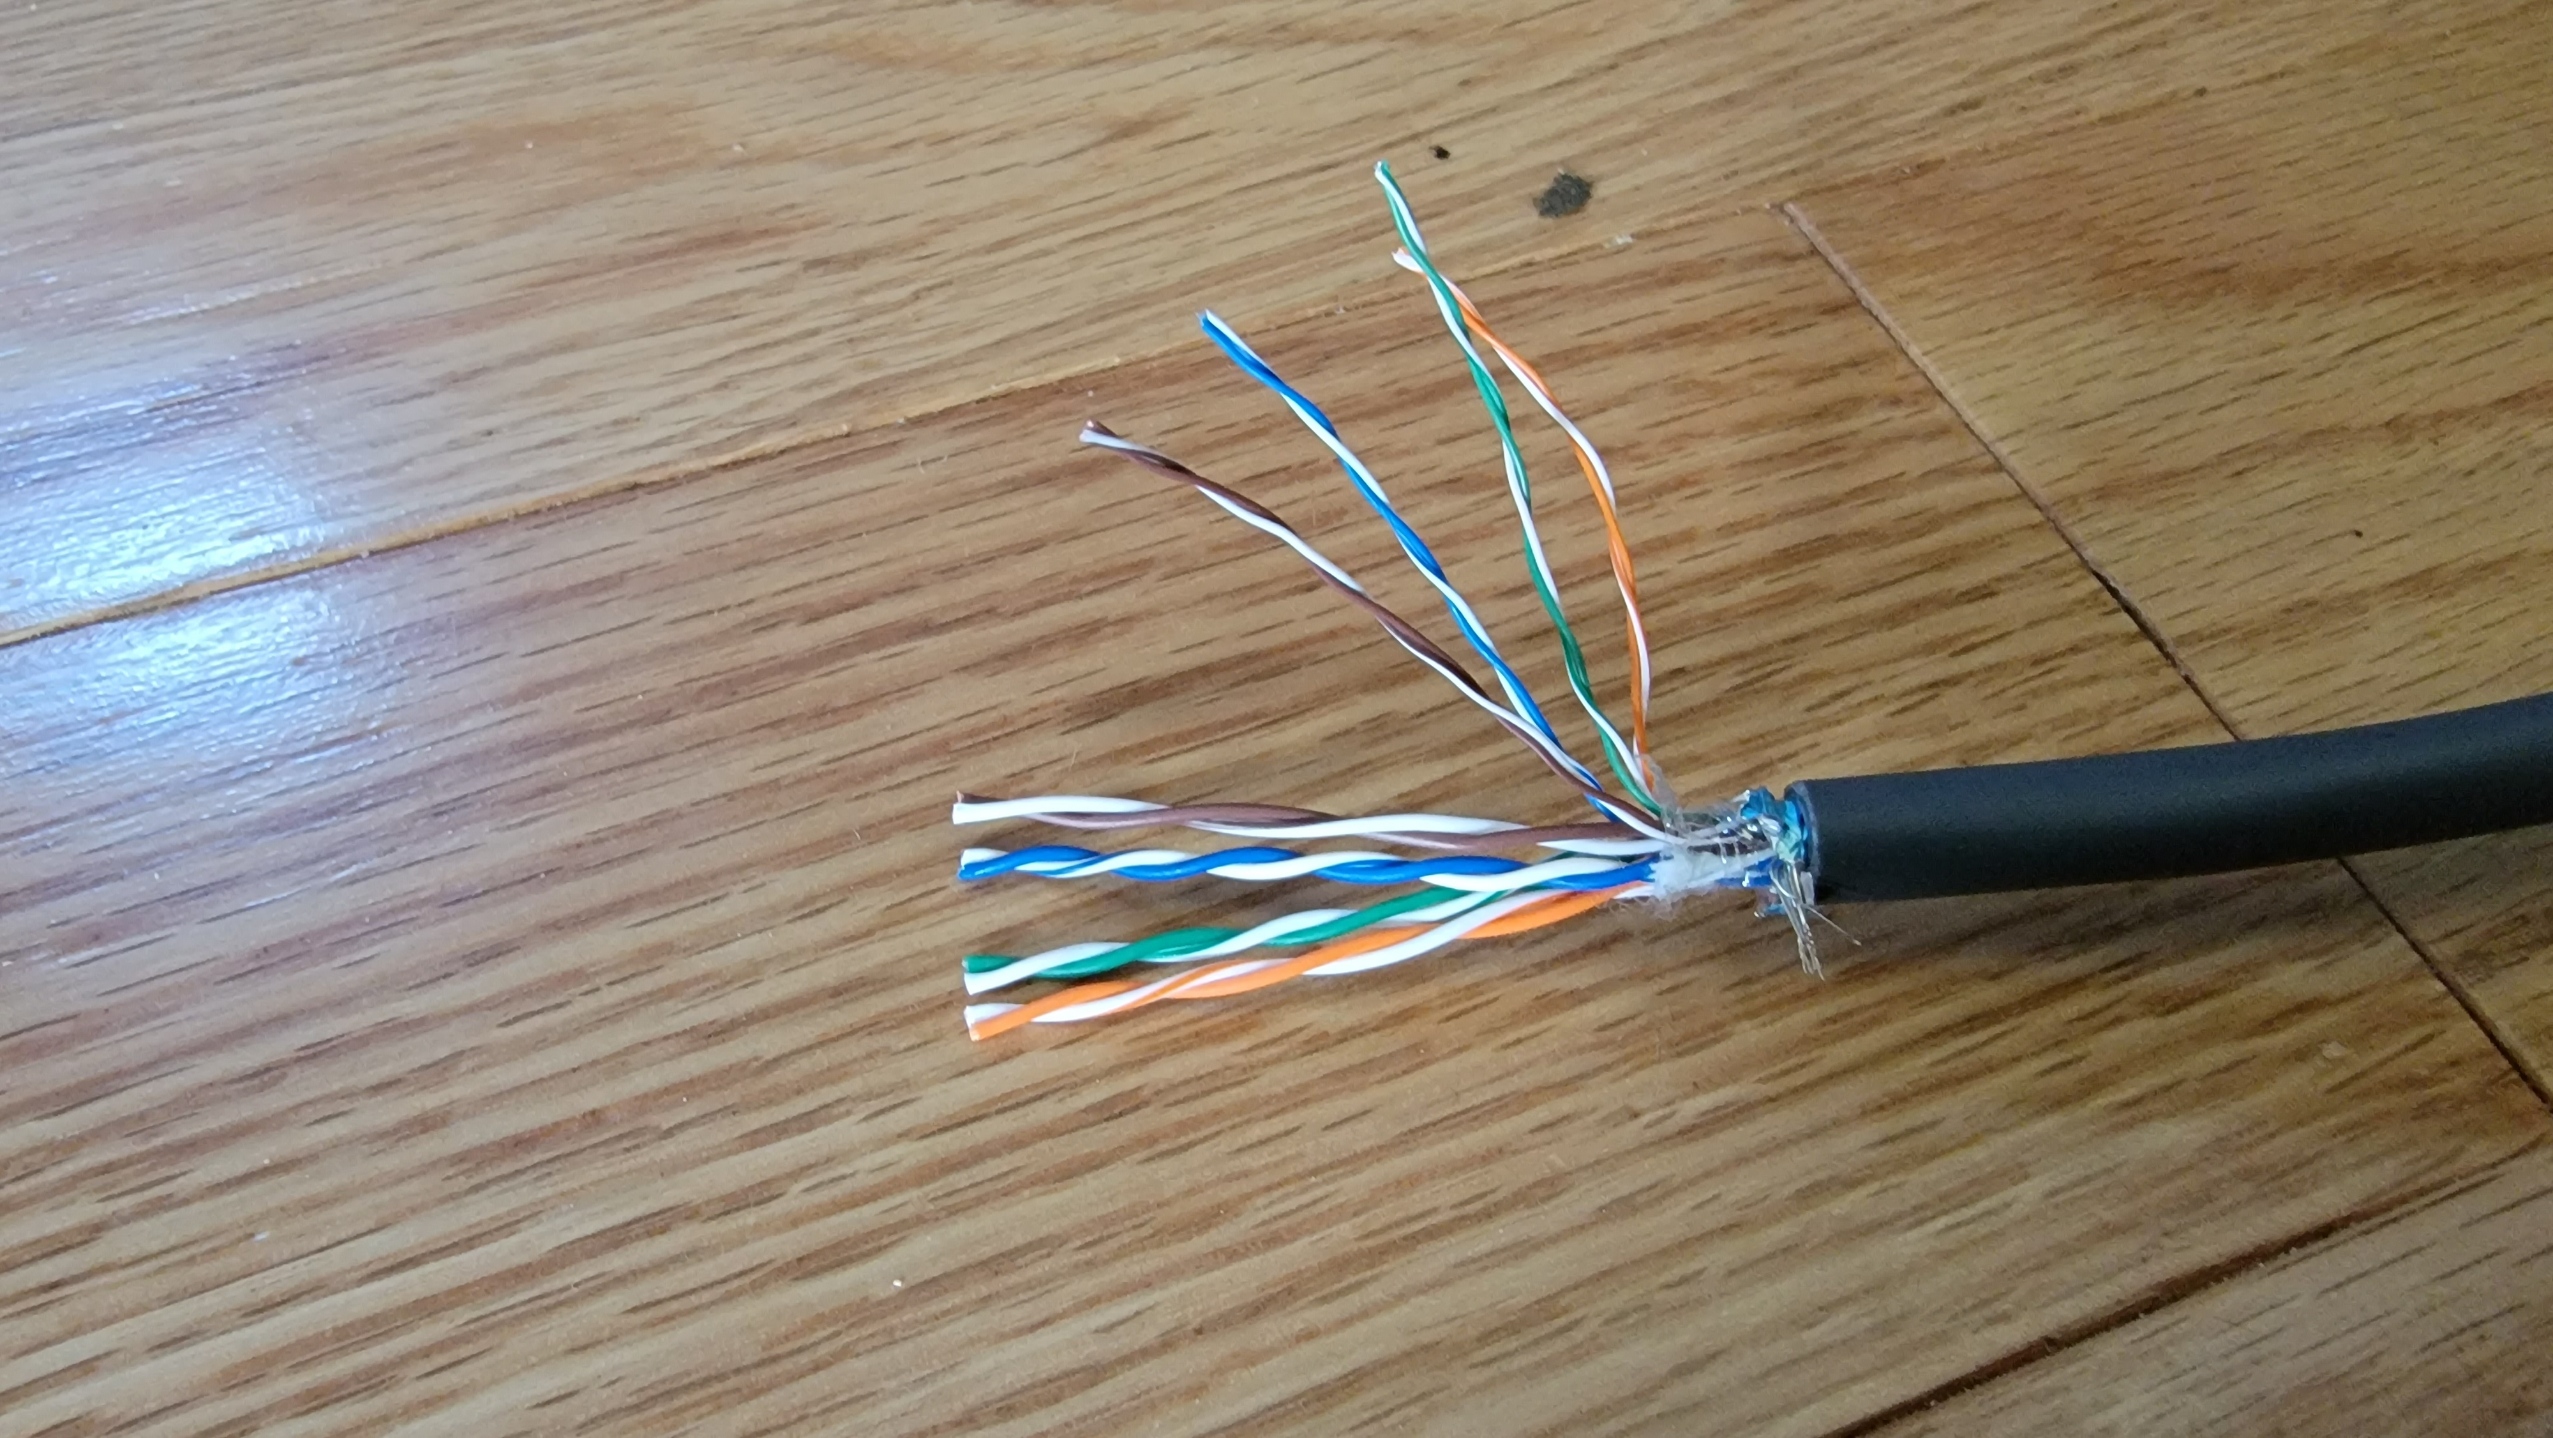
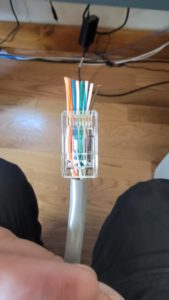
The ethernet adapter with the connector cut off showing the two sets of wires inside. You want to use the thicker wires, as the thin ones go to the ethernet port on the adapter.
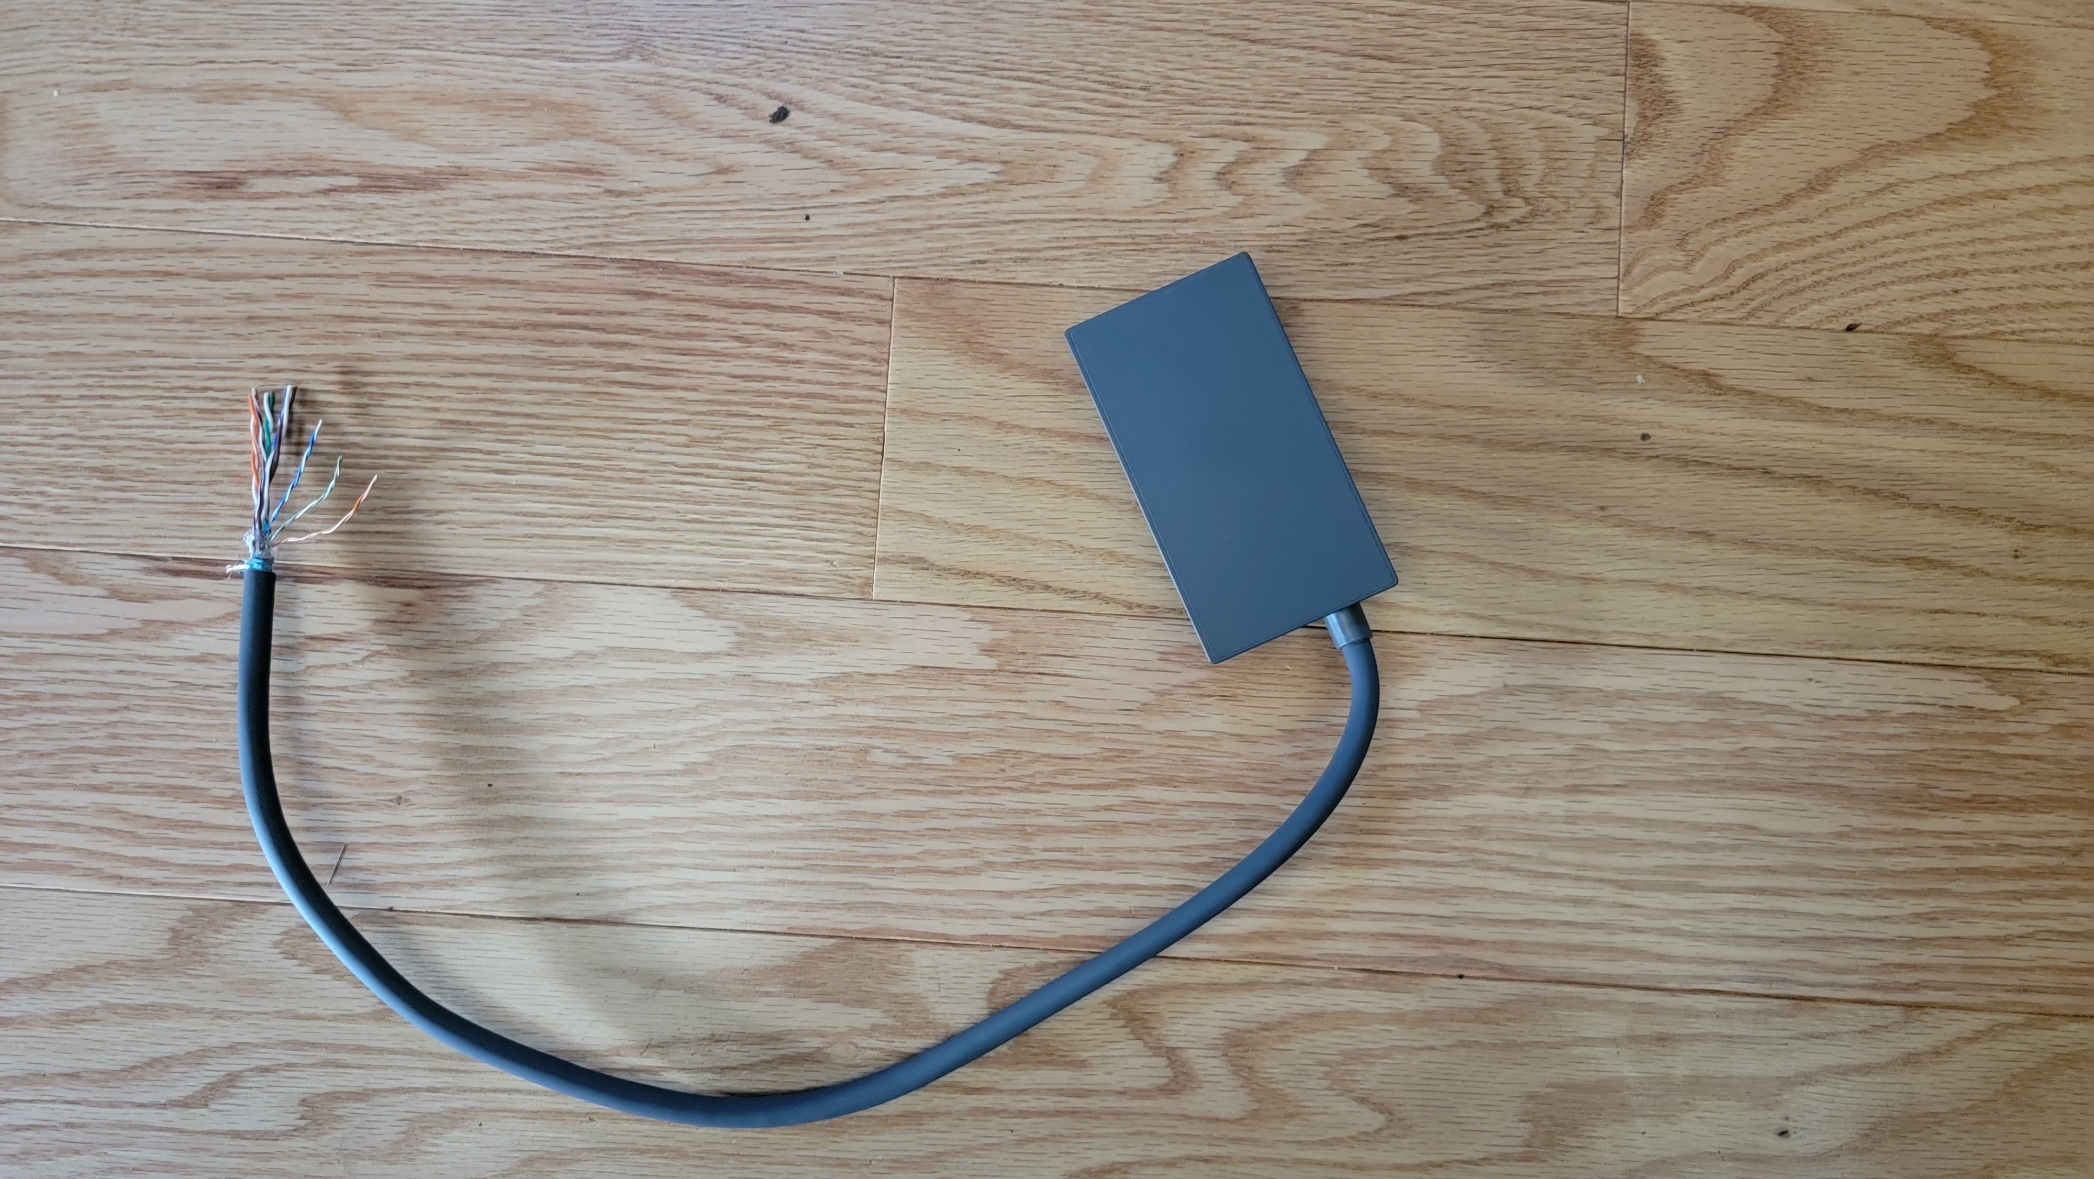
The Ethernet Adapter
I finally after waiting for over a year with a deposit down, received my Starlink unit. I am temporarily back in my Utah home taking care of spring chores, but will be bringing the Starlink up to my off grid cabin this coming weekend and giving it a real trial in the remote mountains. The issue is, when you get this ‘gen 2’ unit, it requires a giant and ugly router to both power the unit and provide wifi connections.
This router is not very capable and has very limited configurability and is not up to my requirements for running a network. Further, it requires 110v connection. This does not fit into my DC first power in my cabin, as every conversion causes a loss. So I was determined to convert to running this unit without AC power. I’ve read several people who have cut the cable and put ethernet on the end of it to allow for this, but the cable is proprietary, hard to come by, and quite expensive. They sell an ethernet adapter that hangs off of their router to allow to ‘bypass’ it, but you still have the AC connection. This was not going to work for me, plus space in my cabin is at a premium.
So I got all the equipment, including the ethernet adapter, and hitched it all up for a try out and sure enough it worked, but was quite large and clunky with all of this stuff required… Then it hit me. The ethernet adapter itself provided me with both ends of that proprietary connection, and was less than half of what a cable costs…. So I decided to open it up and see if I could get the connectors out.
What I discovered when looking at the circuit is it is actually a pass through of the Starlink connection, plus a second set of skinny wires that export an ethernet connection from the router out to the ethernet port. So what I had in my hands was a cheaper way to cut the cord and create the required connections without changing the expensive cable, and make it so I could have a plug in way of creating a DC connection and remove the router entirely.
Cross the cables
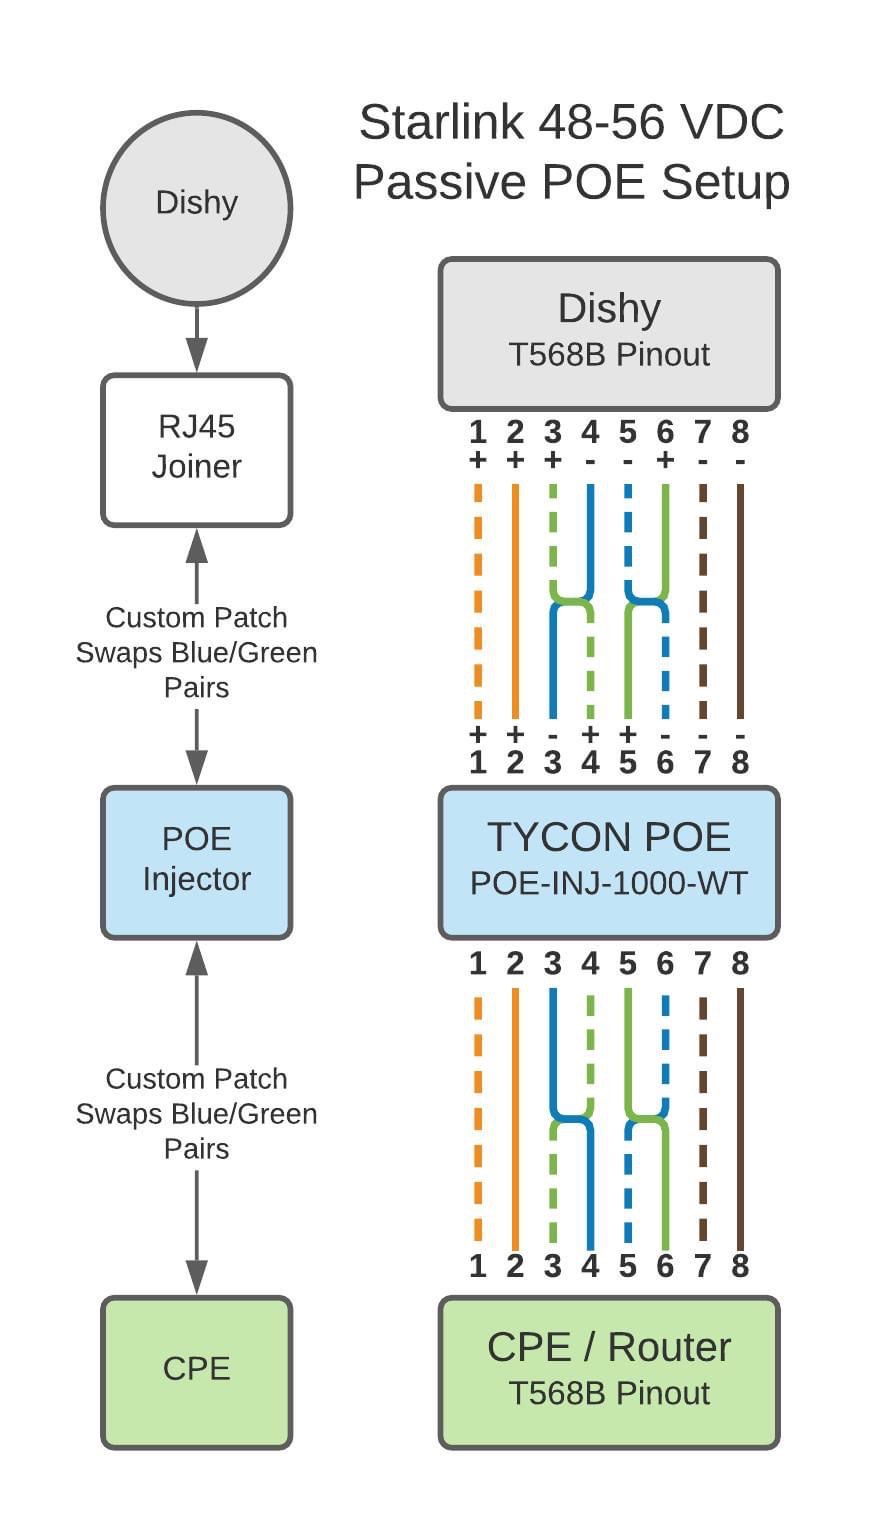
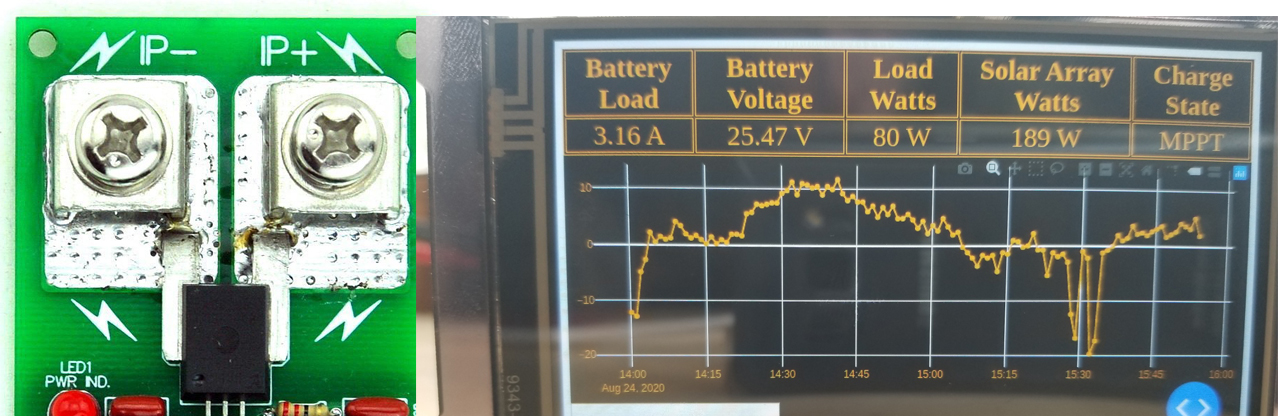
So starlink actually utilizes standard ethernet connections and 48v POE, at about 100w maximum. But for some reason, they decided to swap the wires and not utilize a standard wiring scheme. So in order to utilize a standard POE injector, you must swap the blue and green pairs temporarily to get the power on them, then swap them back to get the data going into the right place. this is the reason for having to wire your own connectors. The diagram to the right explains this, which I borrowed from a previous reddit post on the process.
So what I did was to do the first of these swaps right on the Starlink ethernet adapter. I simply cut the proprietary connector off, then crimped on an ethernet connection following the ‘b’ standard but swapping the wires as described. I now had a nice plug from the female side of the Starlink dish, which allows me to use the existing long cable to plug in, and a male side ethernet plug that can go into the POE injector and receive power from a DC power supply. I was now half way there!
I also purchased the recommended POE injector listed on the right. It puts power on all 4 pairs which is crucial to making this work. One that only charges the normal pairs is not going to necessarily work, so this one seemed to fit the bill and was readily available. I also added a standard 200w 12v->48v DC buck converter. There are tons of these out there available, and almost any of them will fit the bill. It has to be at least 100w though so if the heater on the Starlink kicks on, it will not overload it. This connects easily to the POE injector and will supply the power for the Starlink dish.
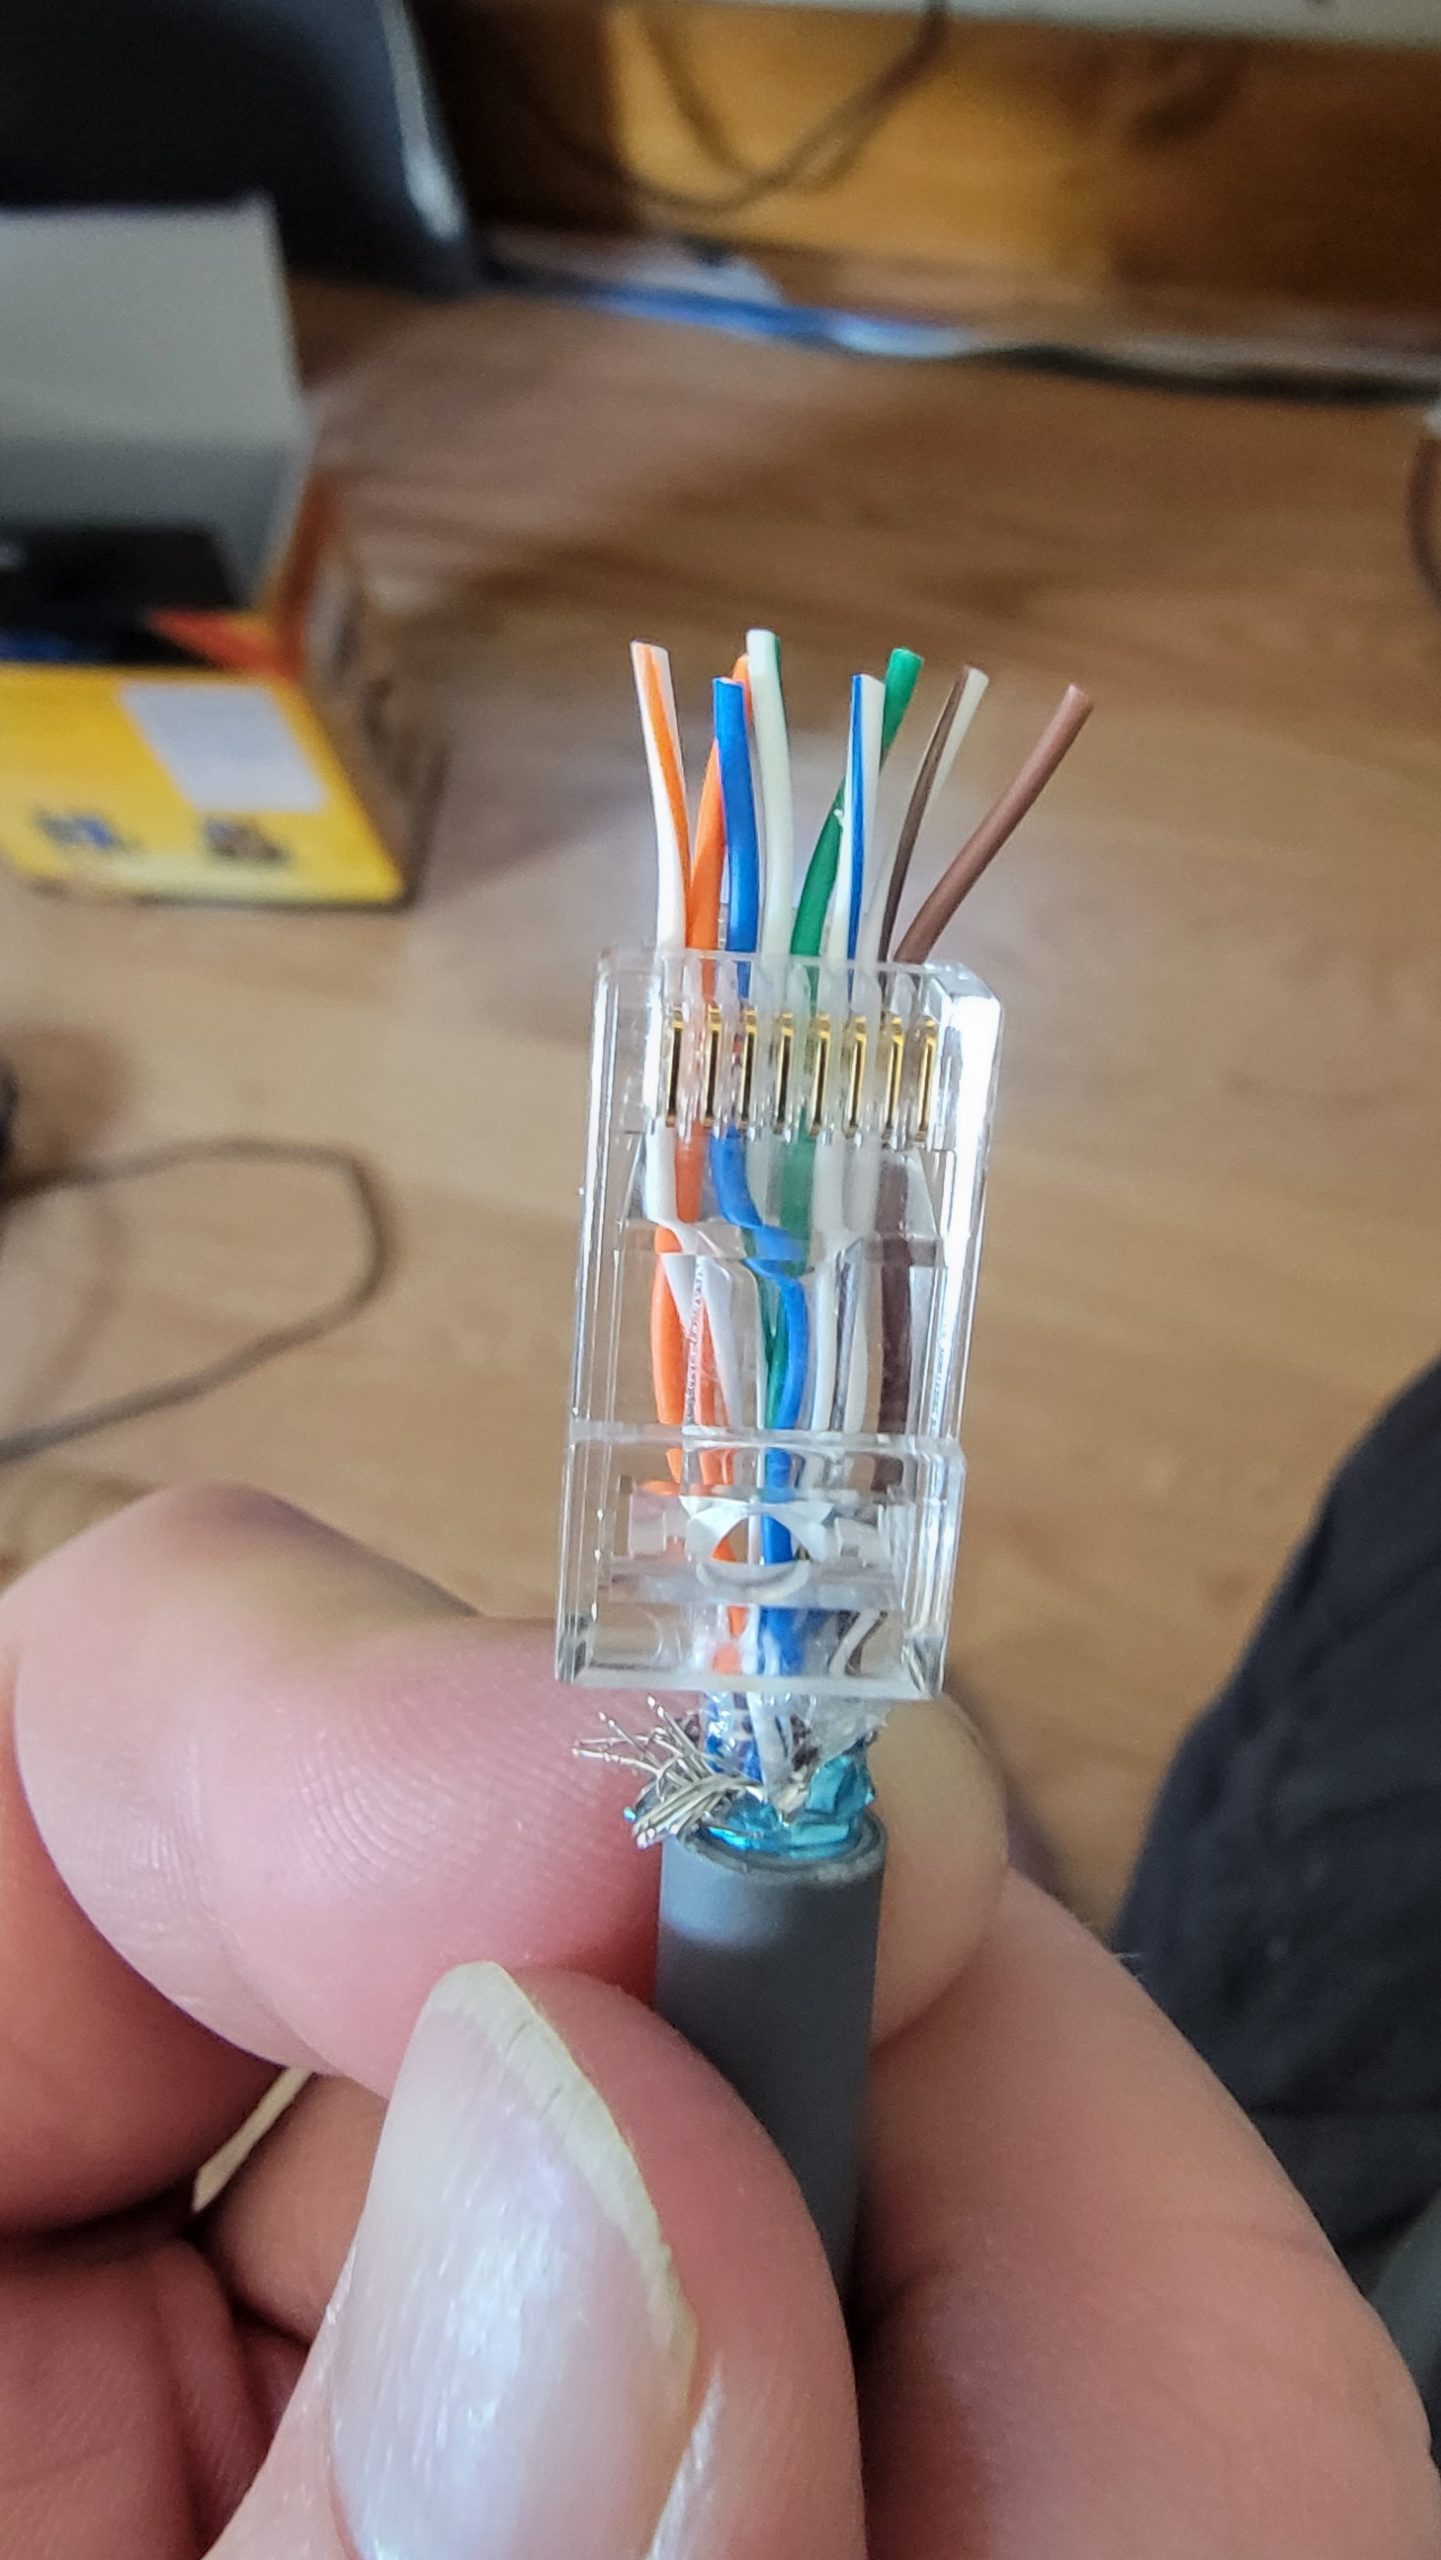
The swapped wired ready to crimp onto the connector. Notice the swap of the pairs. This is very important!
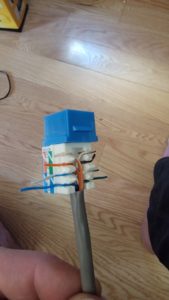
I then built a short cable that performs the exact same swap on the male end, and a standard 586B connection on the female end.
A Short Patch Cable
Then I needed a short cable that goes from the POE injector to the PC or Router that we will directly connect to the Starlink dish. This I made as male to female cable that swaps the same pairs on the male end to basically put the data back onto the correct lines for a normal connection. This is vital to making it all work.
By doing a simple cable like this it allows me to connect any standard patch cable to this, and be served up a single IP address by the dish itself, without involving their router at all.
Check and Double Check
After you have it all wired up, I would personally suggest checking, double checking, and then not actually going through with this modification. I am sure this voids your warranty, and you can certainly utilize the included router and cables with an inverter to power your dishy, but for me I just couldn’t let it sit that way and want the highest efficiency both space and power wise. So for me I was OK with the risk. Proceed at your own caution.
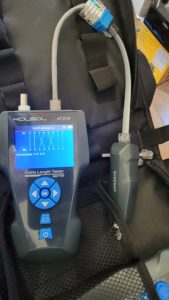
Make sure the pairs show swapped as shown on the tester
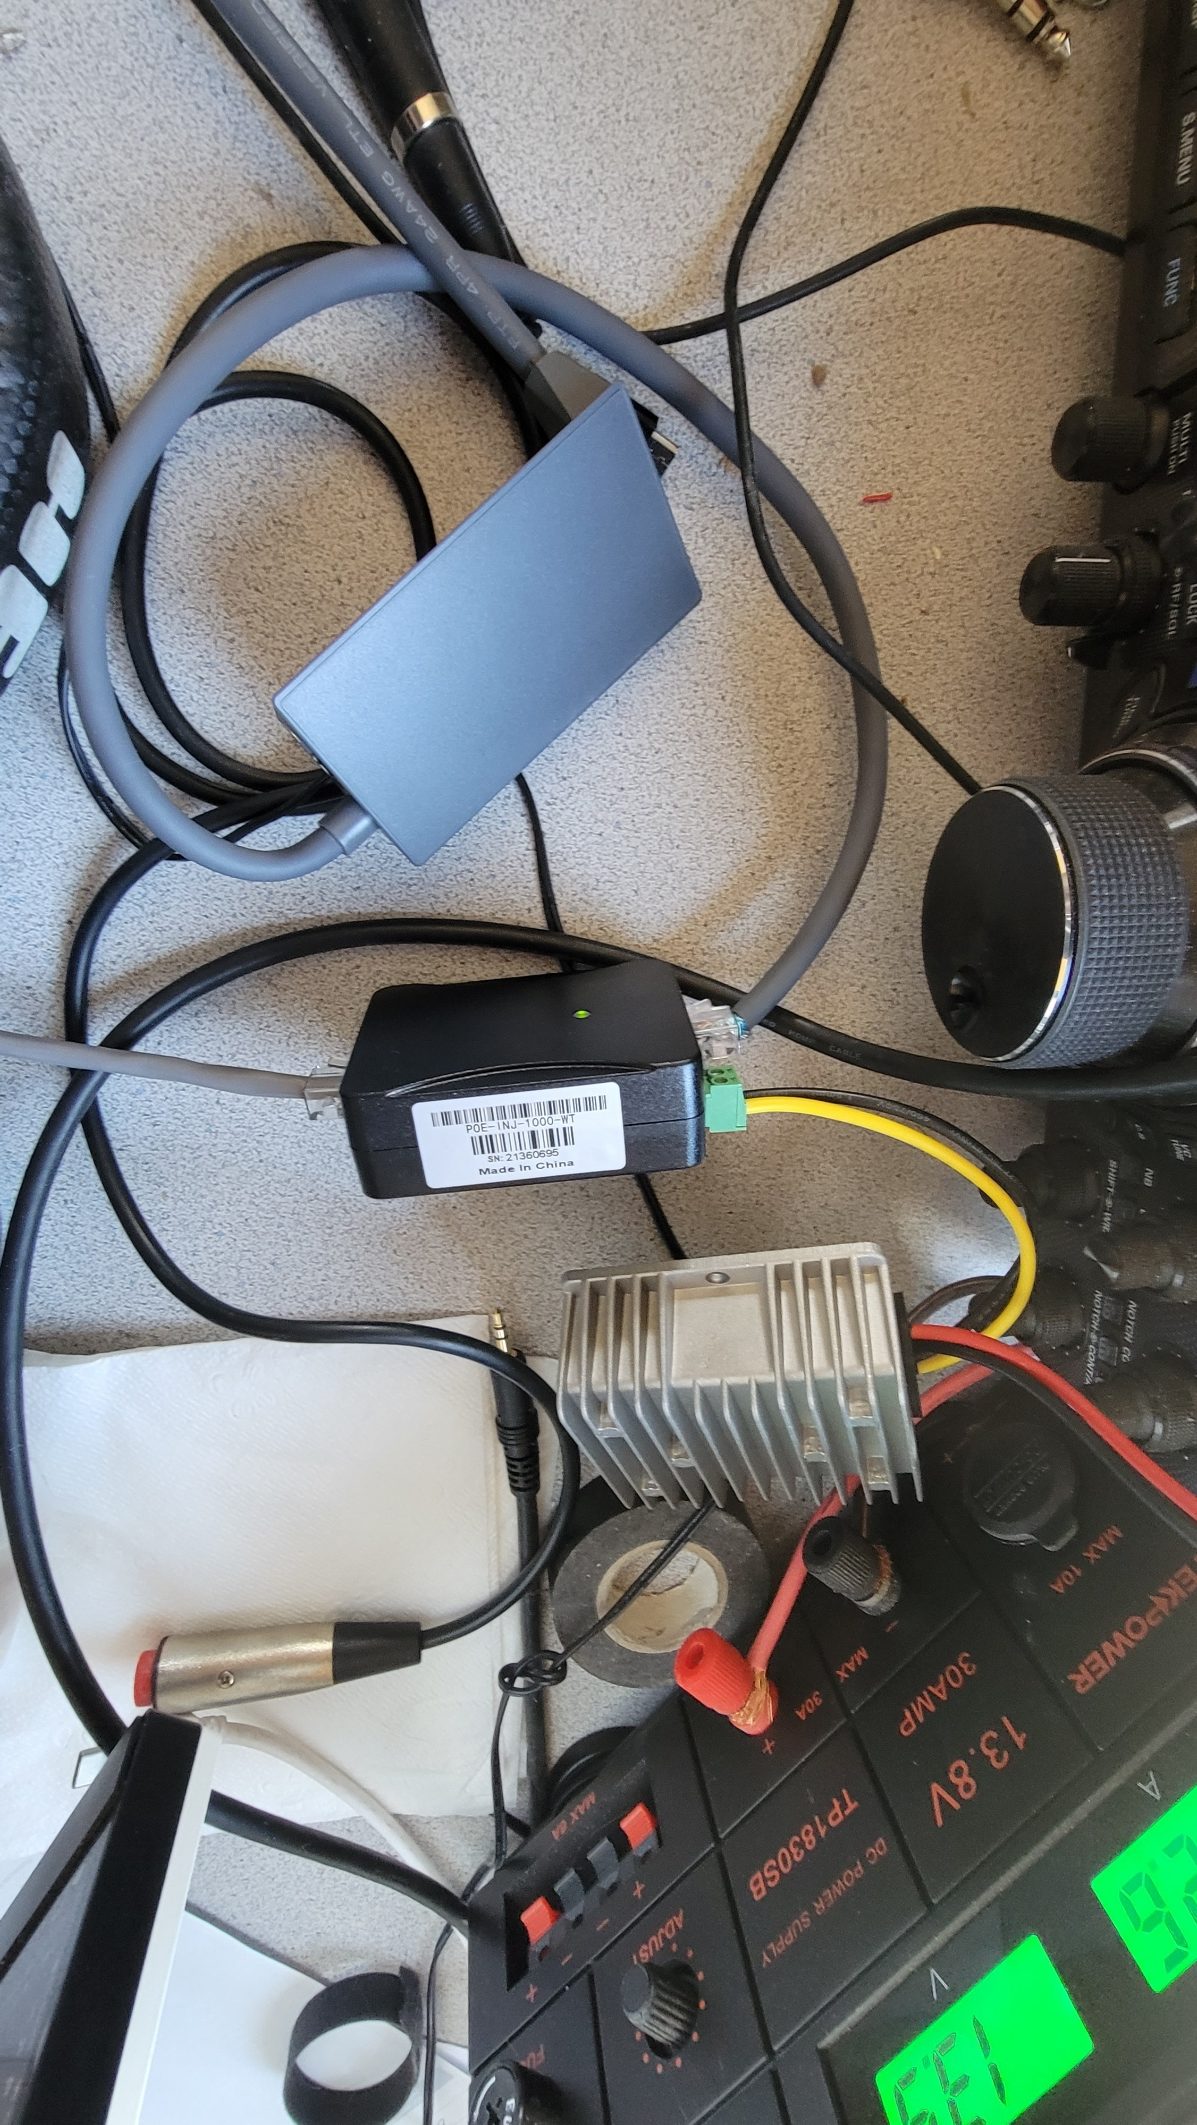
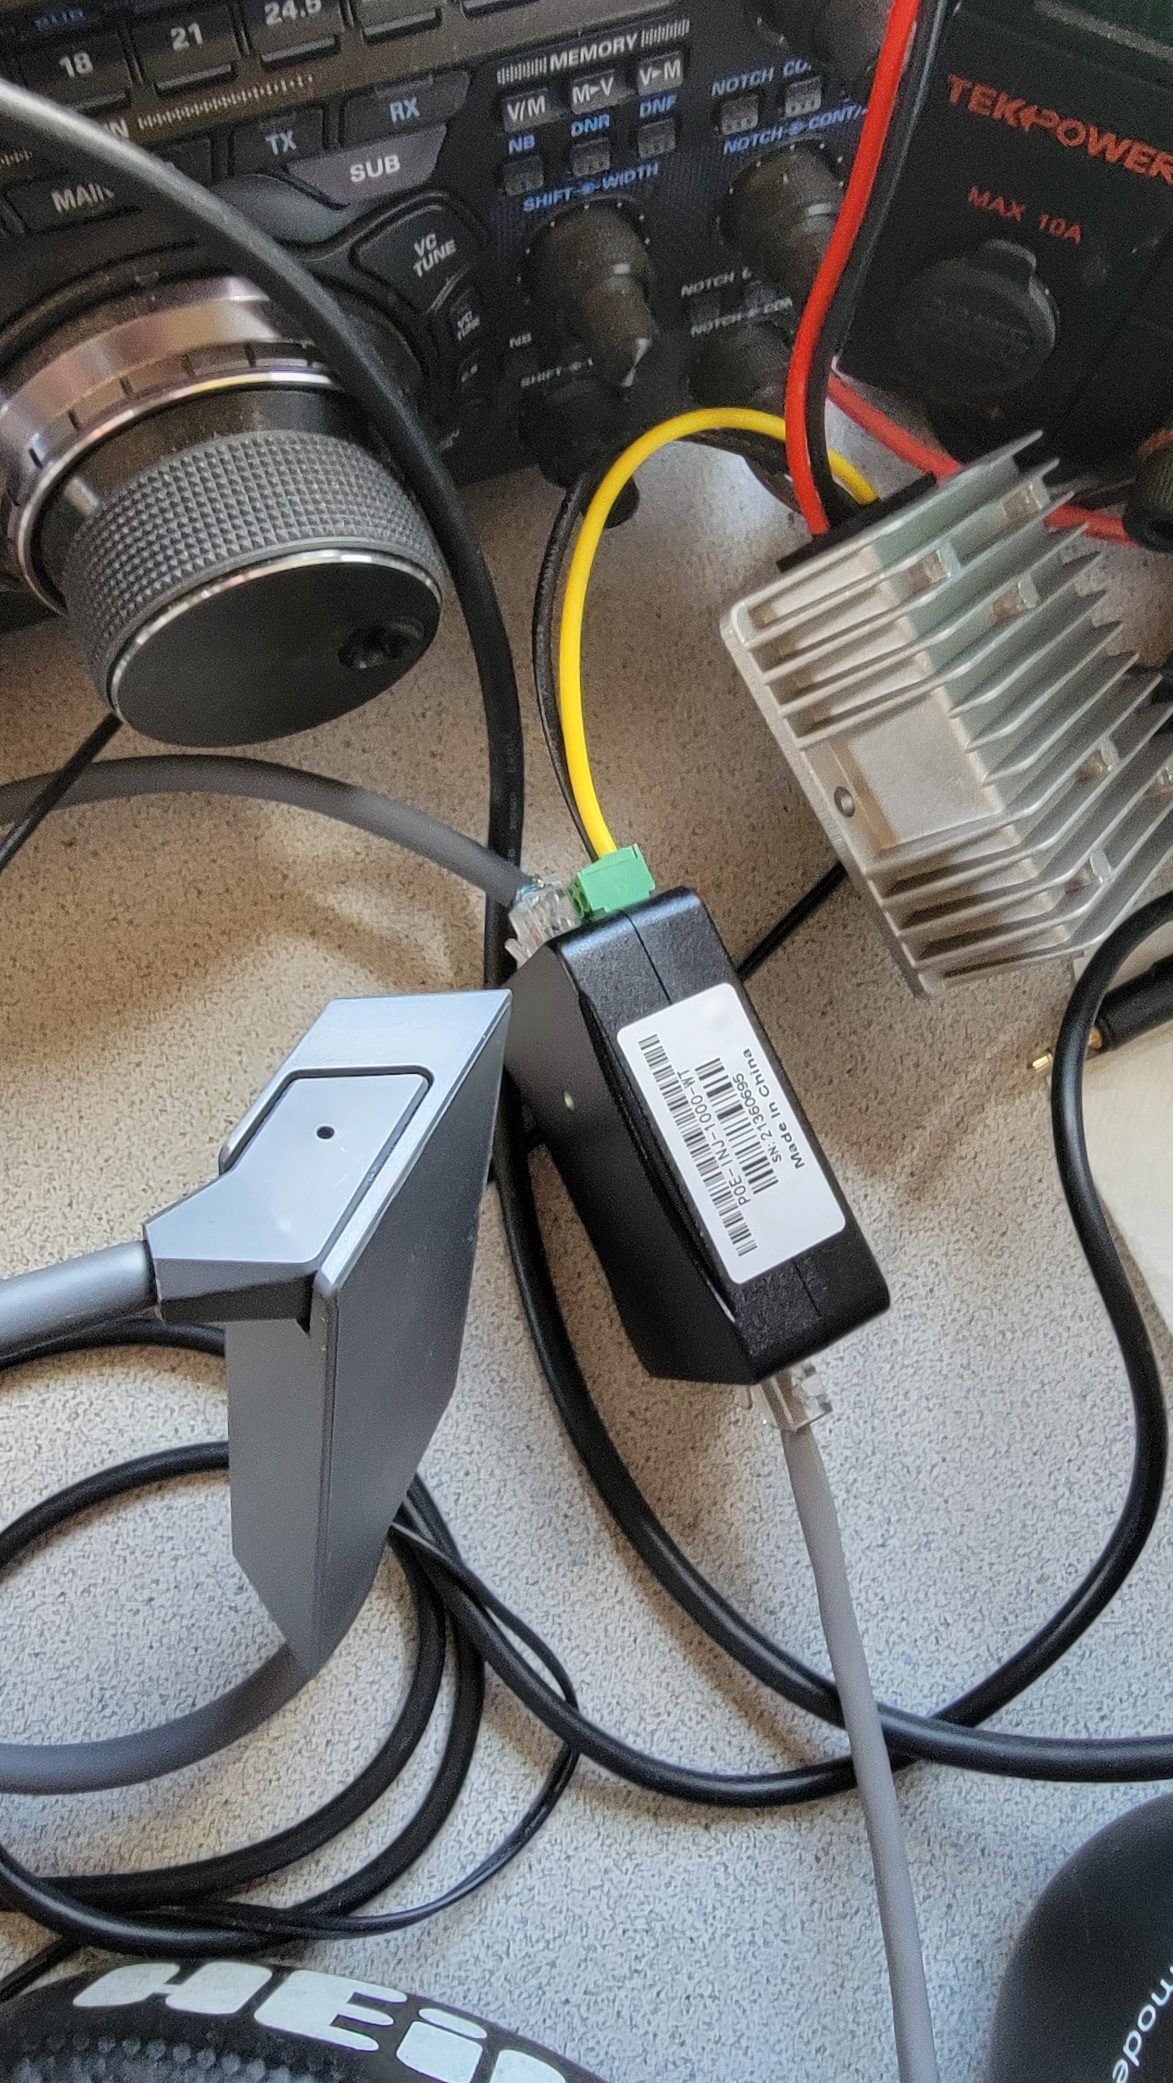
Connected all together…. Ethernet adpater from Starlink goes to the POE side of the injector, patch cable goes to the data side, and to PC or router from there.
Connecting All of the Pieces
So once you have all of these pieces built, then the connection is pretty straight forward. Simple plug the Starlink ethernet adapter you modified into the POE injector. Then plug your patch cable into the other side of the POE injector (non POE side), and then use a normal ethernet patch cable to go either to a PC or router. Then plug dishy into the ethernet adapter. Finally plug your buck converter into a DC power supply. You are now going to have to wait for a few. It takes dishy a bit to come all the way up to respond. So don’t panic, but be aware of a few things.
First, if you are plugging dishy into a router, you are going to need to make a static route to 192.168.100.1 for your wan port. There is a landing page there that gives you access to all of the standard web interface stuff to interact with dishy. That will also allow the ios or android app to work as well.
That said, I suggest you first test with a direct connection to a PC, and in that case you don’t need to do a thing. You will have that route already defined.
Success!
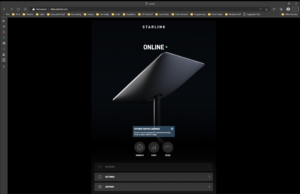
Well with great nervousness about blowing up my new dishy, I went ahead and applied power. I had this directly connected to my pc, and sure enough I saw an ethernet link and traffic. Clearly, this was going to work.
After a bit of time, I was issued an IP address, and going to 192.168.100.1 lead to the dishy page. This clearly works. There is no router involved here, and is a direct connection.
I wanted to set this up before I went remote again, so I am roaming, but even then I am seeing just fine speeds. So success and am looking forward to installing this at the off grid cabin this Friday!
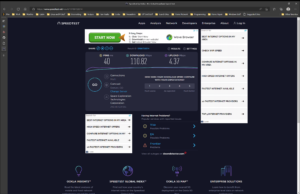
Success! Online and with roaming great speeds!
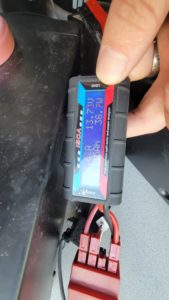
Direct DC power shows between 19w and 48w with no heater
And the Results are In!
And so as you can see I sit around 19W to 48W of power usage of direct DC. Typically, it sits around 35W of usage it seems. In the long run it will be interesting to see what it takes for power over time, but for right now it is in line with what Viasat utilizes.
So now I am ready to go with a pure DC powered Starlink unit and am excited to see the difference it makes at my cabin. Unlimited data and reduced latency is going to be a game changer. The next blog will be on the other half of the config to make it work on my network, and the results I actually see.
So join me next time to see what Starlink really means to an off grid CTO!
Well done!
Awesome, thankyou for the excellent detail. I was looking to do this in my motorhome, saving 12 volt power is what it’s all about.
This is exactly what my sailboat needs. Thank you for sharing all the work and details put into this article. I’m sure this will help many individuals! Parts are ordered, now I wait. Couldn’t get that specific peo but heard it’s the same pinning
As long as it puts power on four and not two you should be good. That POE is still showing available on Amazon btw, if the one you got doesn’t work out. Have fun with it. Working great for me still.
Thanks for this! I’m not seeing a name or link for the POE injector “listed on the right”. Can you post here in comments please? Thanks
The model number is in the diagram, but for quick reference it is Tycon Systems POE-INJ-1000-WT High PoE 4 Pair Injector. It is available many places, but I got mine on Amazon for the easy return process. I have heard of some people getting a bad one so check it out using straight through wires before you begin your work using a tester of any kind. Any 4 pair injector should work that accepts higher wattage. Just don’t get the cheaper 2 pair ones or this won’t work.
Can I ask what did you use for your 12v-48v DC converter?
I used this one from Amazon:
https://smile.amazon.com/dp/B09X2R84H4?th=1
But any matching the specs will work just fine
I see you picked up the 10A/480W model of the 12-48v converter on Amazon. Considering the dishy uses less than 100W, wouldn’t the 3A/144W model have sufficed? It costs less than half of the 10A model, and is probably more efficient too: https://smile.amazon.com/dp/B09X2R4YHS?th=1
These things are already so efficient I am not concerned about the differences, as I can’t imagine it would be significant. At the time, nobody really knows what dishy draws at its maximum. I also believe these are mass produced and cheap, so I don’t want to push it to the limit, or even be close to it in fact, so wanted a good margin of error. So yes, I went overkill on it just to be safe. For the difference in price, the difficulty of me getting a replacement (drive to town one hour each way), and the unknowns I just figured go with this and see what happens. Also, that was my test item for initial development.
I actually utilize a 24v-48v converter once I did the permanent install in the cabin, as my system is native 24v, so even less loss… Most people ask about the 12v option though.
When I click on the link, this is what comes up – 12V 24V to 48V DC Step Up Converter Input(9V-30V) Boost Waterproof Module Transformer (8A 384W)
Is that the correct specs?
That will be more than enough for sure, which I appreciate personally. I don’t like to push the specs right to the limit on these items. Starlink can draw over 100W when on snow melt mode, so I personally would not go with anything less than a 150W limit, and the more the better for any surges or such.
Excellent write-up.
I am almost certainly moving this direction too. I successfully performed a “router delete”, not the same as a bypass. Currently using an AC powered injector. The next logical step for a portable solution is obviously DC.
Your write-up gives me a bit more confidence.
Mate,
Love your write up and I’m going to be doing the same here in Australia when I finally get mine. Bit of a out there thought but why not utilise the thinner cables out of the ethernet adaptor instead of having to create a short patch cable? I don’t my unit yet and obviously don’t have a hands on with it but just a thought.
Not quite sure I am following on using the second set of cables…. I guess I could have kind of hung both ends off of the same cable and done it that way if that is where you are going with it. I really just wanted something simple inline so I didn’t have to cut the long cable, and also make it easy to switch back to the starlink router if support required it. So I honestly didn’t really think through making it ultra clean.
If you try that out and have some success with it, let me know. Thinking of getting a second one to use for RV mode as I really don’t want to move the one at the cabin, and like the idea of having a backup I can activate if needed.
Leon,
Unfortunately, it isn’t straight forward to re-purpose the Ethernet connector within that adapter, it’s more complicated than just patching the thick cat5e wires to the cat5e thin wires.
This guy has a full teardown:
https://olegkutkov.me/2022/03/07/reverse-engineering-of-the-starlink-ethernet-adapter/
Why not just provide power through the cut cable and connect the router POE to the adapter ethernet connector, so no need for a POE injector, just DC power to the correct pins on the cut cable of the ethernet adapter? Thanks for the write-up.
you would loop back the data to the adapter to output on the existing ethernet port
There is additional circuitry in the POE injector. I believe there is more to POE than just simply adding the DC power in order to not interfere with the data signal, but am not an expert on that. So I just went with the POE injector. There are chips inline and involved there, so something else is going on besides just adding DC power.
Jim Olsen, wow that name takes me back to watching George Reeves and Jack Larson as Superman and reporter Jimmy Olsen in the 60s.
You wrote that a POE injector was listed on the right but no Jim, it isn’t. The page is set out in one long column down the lhs. At least it is for me on Mozilla. There is no link to the POE injector in any case and the image you refer to may or may not have a model number; it’s too low res to read anything on it.
If you could bob up with a couple of alternative POE injectors would be great because here in Oz, I can’t get the Tycon injector.
Yeah, that is the model number of the ethernet poe injector. See my reply earlier that has the model number in a reply comment as well. Here is the info “Tycon Systems POE-INJ-1000-WT High PoE 4 Pair Injector”. Going to Amazon right now shows 18 of these in stock. Otherwise find another item matching its specs. The main thing is that it is a 4 pair injector, and high power. I have no experience with any other brands to be able to recommend an alternative, but this is available on Amazon now.
Thank you. Where did you get the male and female connector? There exact name would help me. Also, when you unraveled the dark gray cable, you had a lot of whites, but when you placed it in male connector, you only had 1 white, and you swapped green and blue. Did you wire the whites together>
There were double the number of wires in there as normal for ethernet. The skinny ones come from the starlink router (not the dish) and provide the ethernet port. The thicker wires are the cables from the dish and are a straight passthrough. All wires of the thicker type are put into the rj-45 connector in the pattern described (swapping a couple for the POE, then unswapping them again to go into your ethernet device.
This is great! Making the same conversion. Only question is what did you do with the grounded pairs coming out of the starlink adapter/bypass?
I just cut off the skinny wires that exported the ethernet from the starlink router, as they are not needed. The full size wires are a straight passthrough of all of the connections so that is all that is needed
Hey,
I have the v1 round dishy.
Is the swapping of wires the same?
Thank you, Jim! As an RVer who refuses to use an inverter, this write up is really interesting. I don’t want to have to wait for Starlink to offer a DC power option (if they ever do). Fortunately I have the tools and networking background to do this project. For a mobile Starlink setup, my next question would be what standalone DC-powered wireless-capable routers exist that provide a standard WAN Ethernet port, without all of the unneeded cellular circuitry? I haven’t found anything that fits the bill yet, so grateful for any suggestions.
Answering my own question here, I think I found an appropriate mobile router that has a WAN port, the TP-Link AC750 Wireless Portable Nano Travel Router(TL-WR902AC).
Just one other note to confirm that the TP-Link router reference above is configurable, so the forwarding required (which Jim mentioned in his follow-on post about integrating Starlink into his existing network) in order to use the Starlink app can be done in the router’s management interface. I have no affiliation with TP-Link and haven’t tried this yet, so remains to be seen if it will work.
You have a few options here. If you want truly portable, this one is a good fast router based on Open-WRT: https://smile.amazon.com/gp/product/B0B2J7WSDK/
That should provide you a good true portable router that supports wifi-6 giving you high speed.
That said, many of the non-portable models actually run on 12v already. Most of the time you can look at the specs and it will tell you. Then you simply cut the cable off of the wallwart it comes with, and plug directly into DC. I am doing this now in my cabin with a separate router and WAP that both run on 12v. I did get the above portable one to give me an option for the complete portable setup, as I am a truck camper and don’t have that much space. I have ordered an RV unit as a backup for my cabin, but also want to use it to work out camping on occasion. I plan to leave it mostly deactivated unless my current residential unit dies on me.
Thanks for the router recommendation , Jim. Much appreciated.
How is the wifi range on this travel router? I am looking for something to use when I go truck camping. I would be sharing internet with friends that are camping in a group.
I find it to be quite good. If I put it up on top of my truck, I can wonder around quite a large area, and it is very fast using wifi6 which I like. I have not measured it specifically for distance to give you a real number, but unless you are in a very large group or very spread out, I think it should be fine. Put it anywhere near your group campfire area and if someone needs it they can always hang out there. And when I say near, I don’t mean your truck needs to be right next to it or anything, just line of site.
Thanks for the info! I’ve got the wires and cut and ready to go, just waiting on my PoE Adapter…question, I have a GL.inet router (USB Powered). You mentioned setting up a static route to 192.168.100.1 to the WAN port. Are you talking about setting it up for a STATIC IP address with 192.168.100.1 as the Gateway, or 192.168.100.1 as the IPaddress…trying to figure out if I set it up as DHCP, or do the static route setup…and then what would I use for the netmask (I assume 255.255.255.0)…any direction that you can point me in to setup the IP, Netmask, Gateway and DNS would be appreciated…Thanks!
What you want is a new static route. The ‘destination’ portion would be the 192.168.100.1 and the ‘next hop’ portion would be the ip assigned to your wan port by dishy. This just tells the router how to get to 192.168.100.1 as that IP is not actually used by any of the routing, just how to get to the web interface. The only issue is that periodically starlink may change that ip assigned to your wan port. If your router allows you to specify ‘whatever is assigned to the wan port’, that is the way to go. Mine does not, so if I lose contact with the web interface, I know to go change that value in my router.
So I got it working! Yay. Yesterday there was some network issue in my area, so I couldn’t get it to work consistently, but today, I’m up and running, however, I started getting a “Poor Ethernet Connection Error”…any ideas on what I may be doing wrong?
on the ethernet adapter side, when looking at the pin side of the cable I have:
white/orange | orange | blue | white/green | green | white/blue | white/brown | brown
On the PoE side of the Patch cable I have:
white/orange | orange | blue | white/green | green | white/blue | white/brown | brown
On the router side of the patch cable (I have a male plug to plug into the router) I have:
white/orange | orange | white/green | blue | white/blue | green | white/brown | brown
I think these are right but I even re-made the cable and I am getting the same error…on the starlink router I’m seeing 20-100 mbps (I’m in a congested area), but on the DC powered method, I’m only seeing around 10 mbps…thoughts?
What an excellent tutorial! I built this very same setup but the static WAN route has me stumped. Where am I to make these entries? I also have the GL.inet AX1800 router.
Thank you.
You need to go to the luci version of the router management software through their link in the custom web interface. Their built in custom web interface doesn’t have the static route options yet, but the open-wrt luci interface does have those options.
Thank you so much, Jim! I can’t tell you how grateful I am for your help and this blog. I’ve built a (much) smaller version of your home solar/battery/network setup in the back of my truck–so that I can work longer periods from out in the sticks. One of my latest improvements have been in converting many of my AC appliances to DC, with the goal to reduce the losses from the inverter conversion, as well as to simplify all of the wiring & configurations. While Starlink doesn’t use *that* much power, every little bit of use-savings helps reduce the substantially higher cost of mitigation.
Hi, I did the 12 Volts conversion, your info was great. Somehow I am having issues with Ethernet speed negotiation, I am using a Raspberry PI as a router and it won’t negotiate at 1GB/s, if I force it to 100Mb/s full duplex it works fine, I revised the wiring many times and all is good. I even went with direct wiring onto the Starling cable (not using the Ethernet adaptor). Did you experience such problems ?
Thanks
Roger
I did not have any problems. Both my ethernet adapter on my laptop and my router negotiated full 1gig speed right up front. I would try another device just to check it and see if it is something specific to the pi. The pi I use for a server is connected to my switch, not directly to Starlink so I have not tried that.
Thanks Jim, I redid all my connections for good measure and I tried my laptop directly in and I do get 1Gb/s but somehow browsing is not working, I can ping fine but the anything with larger payload does not work… The only thing left to replace would be the POE injector. I will try that. Thanks for your help.
That or perhaps the power supply is not providing enough volts or amps? Seems likely it is one of the two there as you are negotiating a signal and such. So either the POE is bad (or not on all 4 wires) or you are getting voltage sag or something like that would be my guess. Can you throw a power meter inline with the POE and make sure you aren’t getting some weird drop? I use an oversized upconverter on purpose to avoid this.
Did you solve this, as it’s also an issue I’m having. If I negotiate to 100 mbps full duplex on my computer everything routes fine. Makes no sense. Similar to TP Link forum “Cannot Access the Internet when connecting an Archer AX6000/AX11000 to Starlink Gen 2” . I know the cable is wired well. I can’t seem to use with a router other than Starlink unless I force the connection to negotiate at 100/Full.
Have you tried connecting directly to a PC or other known ethernet adapter? I use a tplink er605 and I get a 1gig connection no problem. I also used a USB-C ethernet adapter on my laptop, and that also connected just fine at the gig speed. Maybe there is something really finicky with that particular adapter… Are you using the standard 75 foot cable? Keep in mind that realistically it is just an ethernet port out on the dish. If using the ethernet adapter from the router, it is a much shortened version of just extending a port that is already inside of that router (well about half the electronics for one) out into the ethernet adapater through those skinny cables. Inside of the router is really two ethernet ports, and one of them has the funky POE on it.
Sorry I can’t help more on this, but I haven’t seen it do anything but negotiate at full speed so far. Only other thing I can think of to try and see is if you can plug into the ethernet adapter when attached to the router and get full speed, stick the poe adapter (without power) in between and see if that then drops the rate of connection to your router. If so, then you have found the issue and maybe another brand is needed for your router.
First off, thanks for taking the time to respond.
I have tried connecting directly to a PC and it only works when I set the adapter in to 100 Full. (this has to be hard set, otherwise it will negotiate at 1gig, yes standard 75 ft cable, but I’ve modified the cable itself not the ethernet adapter. (I have an extra non modified cable, but the modified cable works just fine with a shielded coupler connected to original starlink router, negotiates at 1 gig and works well)
As Roger describes it will negotiate to 1gig, and shows a good connection. I can ping public sites, but won’t route any other traffic. I hear what your saying that it’s just ethernet port out of the dish, but I suspect something else is going on if TPLINK is publishing a support response: “Cannot Access the Internet when connecting an Archer AX6000/AX11000 to Starlink Gen 2”.
Your suggestion of using original router and cabling through the POE Injector without power is a good one, at least I can potentially validate if it’s introducing something weird at that point.
Thanks again, and if anyone else has insight, I would appreciate. I’ve actually just moved to using original router for now with an inverter until I resolve, it’s still pretty efficient, but would prefer the DC option, and the slight efficiency gain.
For those of us without facebook accounts (myself included 🙂 ), what was causing this? Not enough power, noisy???
I can ping fine as well.
very nice- im going to use the same POE injector you have – looks like its doesn’t regulate the voltage. i have a 48v battery system but the voltage goes up and down with charging – any ideas on how fussy dishy is with voltage ? im thinking a 48v dc/dc rectifier to stabilize the voltage but not too sure if its necessary.
I am not sure on the tolerance of the dish at all. I would put something inline to ensure 48v, as 48v systems go up into the mid 50s, I would be concerned that that is way too far out of spec. Not worth the risk. Especially since this would just be a buck circuit at that point that really should not introduce much if any loss…. Realistically with a standard 48v system it only hits 48v when you are low in charge…
Would it be possible to use the thin cut off wires from the Ethernat adapter and the unsed female port from it to replace your sencond cable (with the famle port). It would make the setup much cleaner.
The issue is there is minimal ethernet hardware inline with the thin wires. For some reason they split the ethernet hardware in half, and half the port is inside the router, and half is outside in the ethernet adapter itself. Yeah, it would have made a lot more sense to just have it all inside the router, but I am not getting the feeling any of this was designed with ease of use in mind… So long answer short, you would have to change the board inside the adapter itself to skip the chips inside. The one main port is truly just a pass through, and is why this ‘hack’ works.
Found this which is only 70W output but would probably be good for warm areas
Tycon TP-DC-1256G-VHP and doesnt require the DC-DC converter as all one unit
Yeah, I have seen it spike to over 80w when the snow melt feature kicks in. I went with a 240w power supply just to give myself plenty of headroom, as I feel like if I don’t push the limits, it will be less likely to fail. But that said you sure can see how it performs and if it works for you.
Hi Martin,
Did you buy that Tycon Converter? and did it work? Im looking at the same one…
Hi Guys,
I started this project down in AUS today. got all the parted needed as suggested.
I can ping and get a IP address but speeds are lower than 1kbps.
so something is not correct.
Did you need to perform a router bypass on the starlink router before unplugging this and patching the 12v dc system together?
I have tried Bothe ways to the same result.
Would love to sort this out. Cheers
No, you don’t need to perform a router bypass. That only affects the router and in this case we have entirely removed it from the equation. I would double check two things. First, you must make sure your power supply is up to the task and is at least 100w with a solid 48v coming out of it. Second, I would double check your connections and make sure all the crimps are good. Are you seeing a good link? If you are getting the ip address and can see the dishy directly right now (web interface is a quick check), then it sounds like things are mostly correct overall. Double check the seating of all your connectors, especially the one directly at the dish. They are notorious for being difficult to seat and causing issues… Perhaps check the debug screen as well to see if there are any clues there.
I see you’ve had this complete for a while. What do you think your power savings are in 12vdc amps hrs?
Well there are two ways to look at it. First, just on Starlink itself I see 10-20w savings on comparing of just the load on starlink. So I run it 24 hours a day, so that is 240wh-480wh a day (amps depends on your voltage). That said, I also do not run an inverter unless needed for specific tasks. Most days I never turn it on at all. If I were to keep that on to run this, that would add on my larger inverter another 20w load on top of this, so 720wh-960wh per day. Very significant numbers when you run it all out. Given my total average usage with starlink and everything else (fridge, freezer, computers, etc) running in my house is only about 4100wh per day switching to AC powered would be a good percentage on top of my current daily use.
Just finished my DC-only conversion for the RV. Big shout out to Jim for documenting his conversion!!! It was a B*#&CH getting my cabling from my network rack to an external compartment with a cable/plumbing entry. I’m always on an inverter while boondocking (residential refrigerator), but every little Ah reduction means a little less generator time for a recharge.
Peplink Max BR1 Pro 5g:
Wired WAN: Starlink (Jim’s DC conversion)
WiFi as WAN 5GHz: Campground or nearby WiFi
WiFi as WAN 2.4GHz: Campground or nearby WiFi
5G WAN (AT&T and T-Mobile SIMs
Peplink Speedfusion Connect (5g offload for Zoom only)
Nice Job thanks a lot.
All fine beside the Dishy web page, could it be, that it does not show up because I activated the Router bypass? I do not think so
Cheers and thx again
Stefan
You need to setup a static route to 192.168.100.1. In my router, I set that as the destination and the next hop as 0.0.0.0 and that enables the dishy web page.
Hey, just wanted to say thank you for the post. I was able to get the same results using my old R7000 router. I used the same injector and converter plugged into some old Dewalt 18v batteries. I couldn’t be happier with the results. Thanks a million Jim!
Hey Jim, thanx a lot good Job works like a charm.
only the Bridge in the router gives me some Router reboots 🙂 because it does not work… would you be so kind an let me know what you did?
Thx in advance
Stefan at the moment -after 38 Countrys in 13 RV life years- in Mexico
http://www.viajantes.de
What kind of router are you using? I have not had any router reboots on either of my setups I created with this. They have been rock solid for me without any issues… It’s your router you are using for internet traffic that is rebooting?
Hello All,
I have the following situation:
Dishy installed with the big starlink cable, connected to the router of starlink.
I need this removed.
So, i was thinking on the following setup in combination with this article:
dishy –> starlink cable –> starlink adaptor –> poe injector –> internal network
the idea is to use the adaptor so that i do not need to cut the big cable.
Connecting the adaptor to the starlink cable, cut of the other end that is for the starlink router, use the 4 thicker wires for connecting directly to a poe injector.
From there the other end goes into a edgeX router, and from the router to a 16 ports switch.
As far i understand, the thinner wires of the adaptor are for the connection between the starlink router and the rj45 port in the adapter. I do not need that connection. In my reasoning, i would be able to cut those, and use the thicker ones, with above diagram.
Or am i wrong ?
can anyone enlighten me ?
This is exactly how I have it setup. The small cables are just cut off, as those actually go to some additional circuitry inside of the ethernet adapter that export the ethernet port from the starlink router. So they really can’t be used for anything other than that as there is extra circuitry involved. The thicker wires are just a straight passthrough, so that lets us use them to give us a starlink connector and not have to cut the expensive cable.
Jim! Thanks so much for this page. I’m about to attempt this. In doing so, I’m making a 2-page instruction document to ensure I have all of the proper equipment & wiring schematics. I’m hoping you would have a couple of minutes to proof the document so I could post on some other forums (and give you credit by linking the original page). How can I email you? Unfortunately, I don’t have the pay version of LinkedIn, so I can’t msg you there.
I have replied directly to your email as I don’t put mine on the website to avoid a bit of spam…. Post here again if you don’t receive it.
Hi Tim,
Did you complete the instruction document? Are you able to share that with me?
Thank you
Jim, thank you for your pioneering work. Following your instructions, I have today installed a DC supply for Starlink on my sailing boat and it works! Like a couple of other commenters here, my ethernet adapters (on two different laptops) must be downgraded to 100Mbps to enable web browsing. At one point, dishy decided I was out of the service area (bizarre, since I haven’t yet moved out of the Mexican marina where it’s registered), but that message has since disappeared. Given the power saving and ease of use however, I’m happy with the performance, which is so much better than the alternatives available locally.
Not sure what would cause the lower connection speed. I’ve done two of these now (residential and an RV backup) and both negotiate at the 1 gig speed on multiple different routers.
Hi Jim,
Thanks for the article!
This helped me with my last installation and it worked perfectly.
I’m moving on to the new high performance dish and need to try and replicate this, but as you probably know they changed to a standalone AC/DC power supply and I can tell you they also changed the color code on the new cable. I already swapped my DC/DC convertor to match the amperage/wattage of the new Starlink standalone power supply.
Do you have any info on the wiring pinout of the new high performance dish?
Much appreciated!
I do not have any information on the high performance dish at all as I don’t have one. So not sure what the pin out on that one is at all. I’ve stuck with the regular rectangular dish as my understanding is that the high performance dish draws significantly more power.
Thanks for the guide!
I did this but the Starlink gets stuck on the Booting status. Any clue of what could be the issue?